
티스토리 뷰
❖ git 주소
https://bitbucket.org/basic-setup/authentication-server/src/main/
- 블로그에 게시한 코드는 주요 로직에 대한 설명을 위한것입니다.
- 전체 코드는 길기 때문에 블로그의 코드만으로는 동일한 구현(구동가능한)을 하기 어렵습니다.
- 정확한 이해를 위해 Git에 있는 전체 코드를 함께 참고해 주시기 바랍니다.
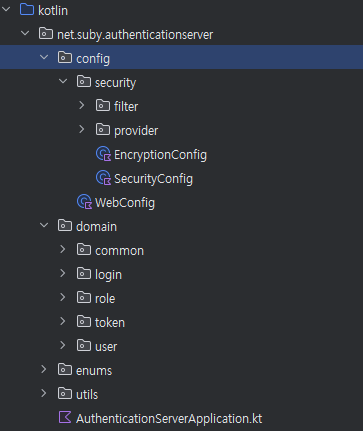
❖ 구조 설명
- config : authentication server 구현을 위한 설정정보
- domain.login : 로그인에 대한 API를 제공합니다. 인증 성공시 access token과 refresh token을 발급합니다.
- domain.role : 권한(role)에 대한 처리를 진행합니다.
- domain.token: refresh token을 재발급을 위한 API를 제공합니다.
- domain.user : 사용자 등록과 자신의 정보 조회의 API를 제공합니다.
1. 사용자 등록 API 구현
- user, role을 등록하는 로직을 구현합니다.
- user entity를 바탕으로 생성 api를 구현합니다.
- 관련 작업 내용은 git 주소를 참고해주세요.
import jakarta.persistence.CascadeType.ALL
import jakarta.persistence.Column
import jakarta.persistence.Entity
import jakarta.persistence.FetchType.EAGER
import jakarta.persistence.GeneratedValue
import jakarta.persistence.GenerationType
import jakarta.persistence.Id
import jakarta.persistence.Index
import jakarta.persistence.OneToMany
import jakarta.persistence.Table
import net.suby.authenticationserver.domain.common.entity.Auditable
import net.suby.authenticationserver.domain.role.entity.Role
import org.hibernate.annotations.Comment
import org.hibernate.annotations.DynamicUpdate

@Entity
@Table(
    name = "user",
    indexes = [Index(name = "idx_username", columnList = "username", unique = true)]
)
@DynamicUpdate
class User(
    @Id
    @GeneratedValue(strategy = GenerationType.IDENTITY)
    var id: Long? = null,

    @Column(length = 100, nullable = false)
    @Comment("계정")
    var username: String,

    @Column(length = 100, nullable = false)
    @Comment("비밀번호")
    var password: String,

    @Column(length = 100, nullable = false)
    @Comment("이름")
    var name: String,

    @Comment("권한")
    @OneToMany(mappedBy = "user", cascade = [ALL], orphanRemoval = true, fetch = EAGER)
    var roles: MutableList<Role> = mutableListOf(),
) : Auditable()
2. auto config spring security 비활성
- 비활성하는 이유
- auto config와 custom config와의 충돌이 발생할 수 있수 있습니다.
- 자동 구성에서는 기본값이 inMemory 방식이기 때문에 운영환경에서는 적합하지 않습니다.
import org.springframework.boot.autoconfigure.SpringBootApplication
import org.springframework.boot.autoconfigure.security.servlet.SecurityAutoConfiguration
import org.springframework.boot.runApplication

@SpringBootApplication(exclude = [SecurityAutoConfiguration::class])
class AuthenticationServerApplication

fun main(args: Array<String>) {
    runApplication<AuthenticationServerApplication>(*args)
}
3. spring security 적용
- httpBasic().disable():
- HTTP Basic 인증을 비활성화합니다.
- 클라이언트가 서버에 요청할 때 Authorization 헤더에 username과 password로 Base64로 인코딩하여 전송합니다.
- 서버는 이 정보를 디보딩하고 인증이 가능한지를 확인합니다.
- csrf().disable(): CSRF 보호 기능을 비활성화합니다. state-less 애플리케이션(API 서버)에서 일반적으로 비활성화
- cors().disable(): CORS(Cross-Origin Resource Sharing)를 비활성화합니다.
- formLogin().disable(): 기본 로그인 폼을 비활성화합니다. 커스텀 인증 방식을 사용하기 위해 폼 로그인을 끕니다.
- authorizeHttpRequests : 요청 URL별로 접근 권한을 설정합니다.
- sessionManagement : 세션 생성을 STATELESS로 설정하여 세션을 사용하지 않습니다.
- JWT 인증 필터 추가(addFilterBefore) : JWT 인증을 처리하기 위한 커스텀 필터를UsernamePasswordAuthenticationFilter 앞에 추가하여 요청을 처리하기 전에 JWT 인증을 수행합니다.
import net.suby.authenticationserver.config.security.filter.JwtAuthFilter
import org.springframework.context.annotation.Bean
import org.springframework.context.annotation.Configuration
import org.springframework.security.config.annotation.web.builders.HttpSecurity
import org.springframework.security.config.annotation.web.configuration.EnableWebSecurity
import org.springframework.security.config.http.SessionCreationPolicy
import org.springframework.security.web.SecurityFilterChain
import org.springframework.security.web.authentication.UsernamePasswordAuthenticationFilter

@Configuration
@EnableWebSecurity
class SecurityConfig(
    private val jwtAuthFilter: JwtAuthFilter,
) {

    @Bean
    fun config(http: HttpSecurity): SecurityFilterChain {
        http
            .httpBasic { basic -> basic.disable() }
            .csrf { csrf -> csrf.disable() }
            .cors { cors -> cors.disable() }
            .formLogin { form -> form.disable() }
            .authorizeHttpRequests { authorize ->
                authorize
                    .requestMatchers("/users", "/login").permitAll()
                    .anyRequest().authenticated()
            }
            .sessionManagement { session -> session.sessionCreationPolicy(SessionCreationPolicy.STATELESS) }
            .addFilterBefore(jwtAuthFilter, UsernamePasswordAuthenticationFilter::class.java)

        return http.build()
    }
}
4. JwtProvider 구현
- application.yaml
- 토큰의 secret 설정과 만료시간을 정의합니다.
config:
  jwt:
    secret: thisIsA32ByteLongSecureSecretKey123 # 최소 32바이트의 길이로 작성해야 한다.
    expiration: 3600000 # 1 hour in milliseconds (1000ms * 60sec * 60min)
refresh-expiration: 86400000 # 1 day in milliseconds (1000ms * 60sec * 60min * 24hours)- JwtProvider 구현
import io.github.oshai.kotlinlogging.KotlinLogging
import io.jsonwebtoken.Claims
import io.jsonwebtoken.ExpiredJwtException
import io.jsonwebtoken.Jwts
import io.jsonwebtoken.MalformedJwtException
import io.jsonwebtoken.UnsupportedJwtException
import io.jsonwebtoken.security.Keys
import java.security.SignatureException
import java.util.Base64
import java.util.Date
import javax.crypto.SecretKey
import org.springframework.beans.factory.annotation.Value
import org.springframework.stereotype.Component

private val logger = KotlinLogging.logger {}

@Component
class JwtProvider(
    @Value("\${config.jwt.secret}") private val secret: String,
    @Value("\${config.jwt.expiration}") private val expiration: Long,
    @Value("\${config.jwt.refresh-expiration}") private val refreshExpiration: Long,
) {

    private val secretKey: SecretKey = Keys.hmacShaKeyFor(Base64.getEncoder().encode(secret.toByteArray()))

	// jwt 토큰을 생성합니다.
    fun generateToken(id: Long, userClaims: UserClaims): String {
        val now = Date(System.currentTimeMillis())
        return Jwts.builder()
            .id(id.toString())
            .claims(userClaims.toMap())
            .issuedAt(now)
            .expiration(Date(now.time + expiration))
            .signWith(secretKey)
            .compact()
    }

	// token(jwt) 를 검증하고 이상이 없다면 payload 값을 리턴합니다.
    fun validateAndGetClaims(token: String): Claims? {
        return try {
            val claims = getClaimsFromToken(token)
            if (isTokenExpired(claims)) null else claims
        } catch (e: Exception) {
            handleTokenException(e)
            null
        }
    }

    private fun getClaimsFromToken(token: String): Claims {
        return Jwts.parser()
            .verifyWith(secretKey)
            .build()
            .parseSignedClaims(token)
            .getPayload()
    }

    private fun isTokenExpired(claims: Claims): Boolean {
        return if (claims.expiration.before(Date())) {
            logger.info { "Token expired at: ${claims.expiration}" }
            true
        } else {
            false
        }
    }

    private fun handleTokenException(exception: Exception) {
        when (exception) {
            is ExpiredJwtException -> logger.error(exception) { "Token expired: ${exception.message}" }
            is UnsupportedJwtException -> logger.error(exception) { "Unsupported JWT: ${exception.message}" }
            is MalformedJwtException -> logger.error(exception) { "Malformed JWT: ${exception.message}" }
            is SignatureException -> logger.error(exception) { "Invalid JWT Signature: ${exception.message}" }
            is IllegalArgumentException -> logger.error(exception) { "Invalid or empty JWT: ${exception.message}" }
            else -> logger.error(exception) { "Unexpected error while validating token: ${exception.message}" }
        }
    }

	// RefreshToken 생성
    fun generateRefreshToken(userId: Long): String {
        val now = Date(System.currentTimeMillis())
        return Jwts.builder()
            .subject(userId.toString())
            .issuedAt(now)
            .expiration(Date(now.time + refreshExpiration))
            .signWith(secretKey)
            .compact()
    }

    // RefreshToken 검증 메서드
    fun validateRefreshToken(token: String): Boolean {
        try {
            val claims = Jwts.parser()
                .verifyWith(secretKey)
                .build()
                .parseSignedClaims(token)
                .payload

            return claims.expiration.after(Date())
        } catch (e: Exception) {
            return false
        }
    }

    // RefreshToken에서 사용자 ID 추출
    fun getUserIdFromRefreshToken(token: String): Long {
        val claims = Jwts.parser()
            .verifyWith(secretKey)
            .build()
            .parseSignedClaims(token)
            .payload
        return claims.subject.toLong()
    }
}
5. JwtAuthFilter 구현
import jakarta.servlet.FilterChain
import jakarta.servlet.http.HttpServletRequest
import jakarta.servlet.http.HttpServletResponse
import net.suby.authenticationserver.config.security.provider.JwtProvider
import net.suby.authenticationserver.domain.common.exception.BadRequestException
import net.suby.authenticationserver.domain.user.service.UserService
import org.springframework.http.HttpHeaders
import org.springframework.security.authentication.UsernamePasswordAuthenticationToken
import org.springframework.security.core.Authentication
import org.springframework.security.core.authority.SimpleGrantedAuthority
import org.springframework.security.core.context.SecurityContextHolder
import org.springframework.stereotype.Component
import org.springframework.web.filter.OncePerRequestFilter
@Component
class JwtAuthFilter(
private val jwtProvider: JwtProvider,
private val userService: UserService,
) : OncePerRequestFilter() {
override fun doFilterInternal(
request: HttpServletRequest, response: HttpServletResponse, filterChain: FilterChain
) {
val token = getTokenFromRequest(request)
if (token == null) {
filterChain.doFilter(request, response)
return
}
val claims = jwtProvider.validateAndGetClaims(token) ?: throw BadRequestException("Invalid token")
val username = claims["username"].toString()
SecurityContextHolder.getContext().authentication = createAuthentication(username) // SecurityContext는 전역 인증 정보를 관리하는 컨테이너 역할을 합니다.
filterChain.doFilter(request, response) // 인증이 완료된 객체를 가지고 다음 작업을 진행합니다.
}
// header의 AUTHORIZATION 에서 token을 추출합니다.
private fun getTokenFromRequest(request: HttpServletRequest): String? {
val bearerToken = request.getHeader(HttpHeaders.AUTHORIZATION)
if (bearerToken.isNullOrBlank() || !bearerToken.startsWith("Bearer ")) {
return null
}
return bearerToken.substring(7)
}
// UsernamePasswordAuthenticationToken 인증 요청 정보를 담기 위한 객체
// 사용자의 정보와 함께 인증 완료된 객체를 생성합니다. isAuthenticated: true
private fun createAuthentication(username: String): Authentication {
val user = userService.getByUsername(username)
val authorities = user.roles.map { SimpleGrantedAuthority(it.role.toString()) }
return UsernamePasswordAuthenticationToken(user.id, user.password, authorities)
}
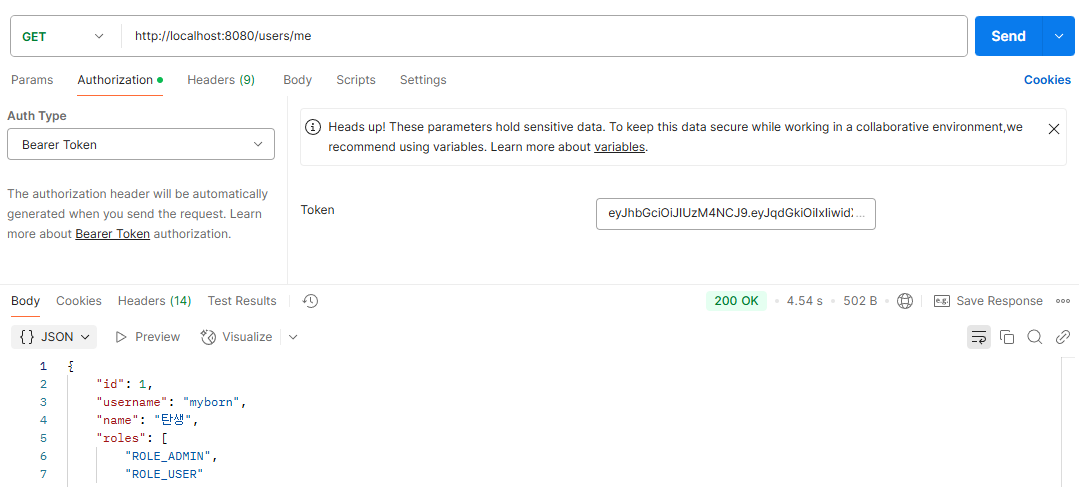
}6. 테스트
- 로그인

- me
❖ 참고
https://jangjjolkit.tistory.com/72
영상
https://www.youtube.com/watch?v=YEB0Ln6Lcyk
https://www.youtube.com/watch?v=DCKE-bWYFxg&t=345s
https://www.youtube.com/watch?v=yfdB97DMbXw
댓글
공지사항