kotlin + rest docs + swagger 문서 자동화
❖ 설명
문서 자동화를 위해 rest docs과 swagger를 함께 진행하였다.
설명이 조금 길긴 하지만 단계적으로 정리하여 이해하기 쉽도록 정리하였습니다.
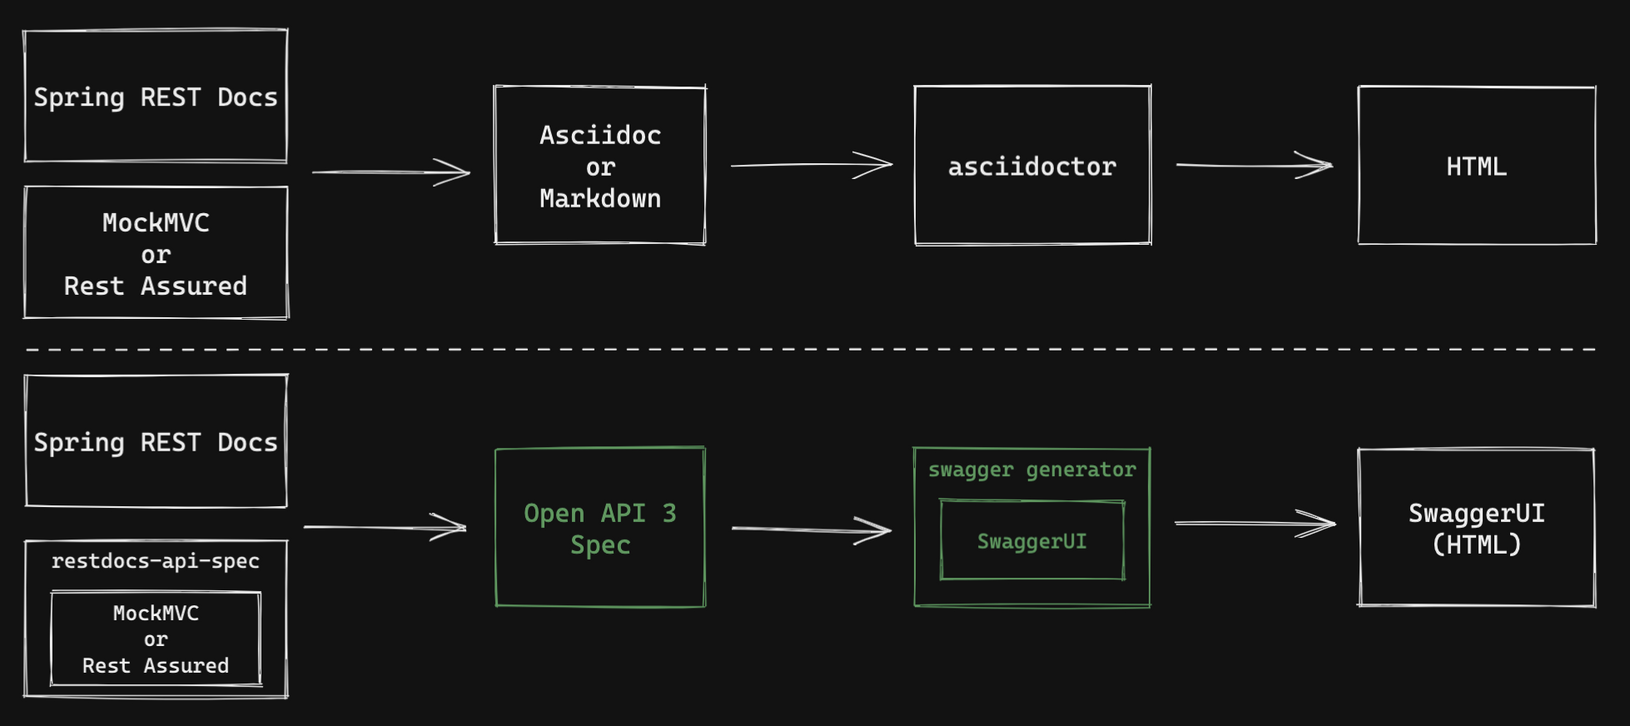
● rest docs을 작성하고 swagger로 변환하는 과정이다.
1. restdocs-api-spec을 정의(test code 작성 및 문서설명)
2. OpenAPI3 spec으로 변환
RESTful API를 정의된 규칙에 맞게 API spec을 json이나 yaml로 표현하는 방식을 의미합니다.
3. OpenAPI3 spec 변환 문서를 swaggerUI에 적용
4. build 및 테스트
❖ git url
https://bitbucket.org/basic-setup/kotlin-restdoc-swagger/src/master/
❖ 구현
1. rest docs의 결과를 Open API 3스펙으로 출력
● plugin version 확인 : https://plugins.gradle.org/plugin/com.epages.restdocs-api-spec
● 최신버전의 경우 호환성 문제가 있는지 에러가 발생하여 한단계 낮췄습니다. (원인은 차후에..)
● 1.1 : com.epages:restdocs-api-spec 모듈의 repository 해결에 사용을 합니다.
● 1.2 : restdocs-api-spec-mockmvc repository를 정의
MockMvc : com.epages:restdocs-api-spec-mockmvc
webflux : com.epages:restdocs-api-spec-webtestclient
- build.gradle.kts
plugins {
   id("com.epages.restdocs-api-spec") version "0.16.4"
}

repositories { //1.1
    mavenCentral()
}

dependencies {
    //..
    testImplementation("org.springframework.restdocs:spring-restdocs-mockmvc")
    testImplementation("com.epages:restdocs-api-spec-mockmvc:0.16.4") // 1.2
}
2. documentation task 그룹을 생성
- https://github.com/ePages-de/restdocs-api-spec#openapi-20-1
- openapi, openapi3, postman task가 있으며 사용할 task에 대해 각각 수정을 해 줍니다.
- server 는 swagger가 spring boot 프로젝트와 같이 뜬다면 base-path를 넣어주면 되고 spring boot와 다른 서버에서 구동된다면 url를 넣어주면 됩니다. swagger 테스트시 모든 요청의 prefix로 해당 url이 붙습니다.
- build.gradle.kts
// OpenAPI 2.0
openapi {
    host = "localhost:8080"
    basePath = "/api"
    title = "My API"
    description = "My API description"
    version = "1.0.0"
    format = "json"
}

// OpenAPI 3.0.1
openapi3 {
    setServer("https://localhost:8080")
    title = "My API"
    description = "My API description"
    version = "1.0.0"
    format = "yaml"
}

postman {
    title = 'My API'
    version = '1.0.0'
    baseUrl = 'https://localhost:8080'
}
3. controller 및 test code 작성
- AccountController
import net.suby.kotlinrestdocswagger.dto.AccountDto
import net.suby.kotlinrestdocswagger.service.AccountService
import org.springframework.web.bind.annotation.GetMapping
import org.springframework.web.bind.annotation.PathVariable
import org.springframework.web.bind.annotation.PostMapping
import org.springframework.web.bind.annotation.RequestBody
import org.springframework.web.bind.annotation.RequestMapping
import org.springframework.web.bind.annotation.RestController

@RestController
@RequestMapping("/accounts")
class AccountController(val accountService: AccountService) {

    @PostMapping
    fun create(@RequestBody request: AccountDto.Request) = accountService.create(request)

    @GetMapping("/{id}")
    fun get(@PathVariable("id") id: Long) = accountService.getAccount(id)

    @GetMapping
    fun getList(search: AccountDto.Search) = accountService.getList(search)
}
- AccountService
import net.suby.kotlinrestdocswagger.dto.AccountDto
import org.springframework.stereotype.Service

@Service
class AccountService {

    fun create(request: AccountDto.Request): AccountDto.Response = AccountDto.Response(id = 1, name = "name", loginId = "loginId")

    fun getAccount(id: Long): AccountDto.Response = AccountDto.Response(id = 2, name = "name2", loginId = "loginId2")

    fun getList(search: AccountDto.Search): MutableList<AccountDto.Response> =
        mutableListOf(AccountDto.Response(id = 3, name = "name3", loginId = "loginId3"))
}
- AccountDto
interface AccountDto {

    data class Request(
        val loginId: String,
        val password: String,
        val name: String
    )

    data class Search(
        val loginId: String,
        val name: String
    )

    data class Response(
        val id: Long,
        val loginId: String,
        val name: String
    )
}
- DocumentBaseControllerTest
import org.junit.jupiter.api.BeforeEach
import org.junit.jupiter.api.extension.ExtendWith
import org.springframework.boot.test.context.SpringBootTest
import org.springframework.restdocs.RestDocumentationContextProvider
import org.springframework.restdocs.RestDocumentationExtension
import org.springframework.restdocs.mockmvc.MockMvcRestDocumentation

import org.springframework.test.web.servlet.MockMvc
import org.springframework.test.web.servlet.setup.DefaultMockMvcBuilder
import org.springframework.test.web.servlet.setup.MockMvcBuilders
import org.springframework.web.context.WebApplicationContext


@SpringBootTest
@ExtendWith(RestDocumentationExtension::class)
abstract class DocumentBaseControllerTest {

    protected lateinit var mockMvc: MockMvc

    @BeforeEach
    fun setUp(restDocumentation: RestDocumentationContextProvider, context: WebApplicationContext) {
        mockMvc = MockMvcBuilders.webAppContextSetup(context)
                .apply<DefaultMockMvcBuilder>(
                        MockMvcRestDocumentation.documentationConfiguration(restDocumentation)
                ).build()
    }
}
- AccountControllerTest
import com.epages.restdocs.apispec.MockMvcRestDocumentationWrapper.document
import com.epages.restdocs.apispec.ResourceDocumentation.parameterWithName
import com.epages.restdocs.apispec.ResourceDocumentation.resource
import com.epages.restdocs.apispec.ResourceSnippetParameters
import com.epages.restdocs.apispec.SimpleType
import net.suby.kotlinrestdocswagger.dto.AccountDto
import net.suby.kotlinrestdocswagger.service.AccountService
import org.junit.jupiter.api.DisplayName
import org.junit.jupiter.api.Test
import org.mockito.BDDMockito
import org.mockito.BDDMockito.given
import org.springframework.boot.test.mock.mockito.MockBean
import org.springframework.http.MediaType
import org.springframework.restdocs.mockmvc.RestDocumentationRequestBuilders
import org.springframework.restdocs.payload.JsonFieldType
import org.springframework.restdocs.payload.PayloadDocumentation.fieldWithPath
import org.springframework.test.web.servlet.result.MockMvcResultHandlers
import org.springframework.test.web.servlet.result.MockMvcResultMatchers.*


class AccountControllerTest : DocumentBaseControllerTest() {

    @MockBean
    private lateinit var accountService: AccountService

    @Test
    @DisplayName("사용자 id 조회")
    fun testGetOne() {
        val response = AccountDto.Response(
            id = 1,
            loginId = "loginId",
            name = "이름",
        )
        given(accountService.getAccount(BDDMockito.anyLong())).willReturn(response)


        mockMvc.perform(
            RestDocumentationRequestBuilders.get("/accounts/{id}", 1)
                .accept(MediaType.APPLICATION_JSON)
        )
            .andDo(MockMvcResultHandlers.print())
            .andExpectAll(
                status().isOk,
                content().contentType(MediaType.APPLICATION_JSON),
                jsonPath("$.id").value(1),
                jsonPath("$.loginId").value("loginId")
            )
            .andDo(
                document(
                    identifier = "getOne",
                    snippets = arrayOf(
                        resource(
                            ResourceSnippetParameters.builder()
                                .summary("사용자 조회API")
                                .description("사용자 조회")
                                .pathParameters(
                                    parameterWithName("id").type(SimpleType.NUMBER).description("아이디")
                                )
                                .responseFields(
                                    fieldWithPath("id").type(JsonFieldType.NUMBER).description("아이디"),
                                    fieldWithPath("loginId").type(JsonFieldType.STRING).description("로그인 아이디"),
                                    fieldWithPath("name").type(JsonFieldType.STRING).description("이름"),
                                )
                                .build()
                        )
                    )
                )
            )
    }
}
- 통합 테스트시 시간이 오래 걸리기 때문에 단위 테스트로 정의하는것이 좋다
@WebMvcTest(value = [AccountController::class, ObjectMapperConfig::class]) 테스트할 class를 정의하거나 includeFilters 를 통해 특정 조건을 만족하는 클래스를 스캔할수도 있다.
MockMvcBuilders 는 두개의 클래스를 지원한다.
• standaloneSetup() : 수동으로 생성하고 구성한 컨트롤러 한 개 이상을 서비스할 Mock MVC를 만든다.
• webAppContextSetup() : 스프링 애플리케이션 컨텍스트를 사용하여 Mock MVC를 만든다.
개인적으로 test code는 스프링 애플리케이션 컨텍스트를 올려서 코드를 작성하는것을 좋아하지 않는다. test code가 많아지면 시간이 오래 걸리기 때문이다. 예제는 webAppContextSetup를 활용하였지만 실무에서는 standaloneSetup를 활용해 보려고 한다.
● 이제 rest docs의 개발이 완료되었다.
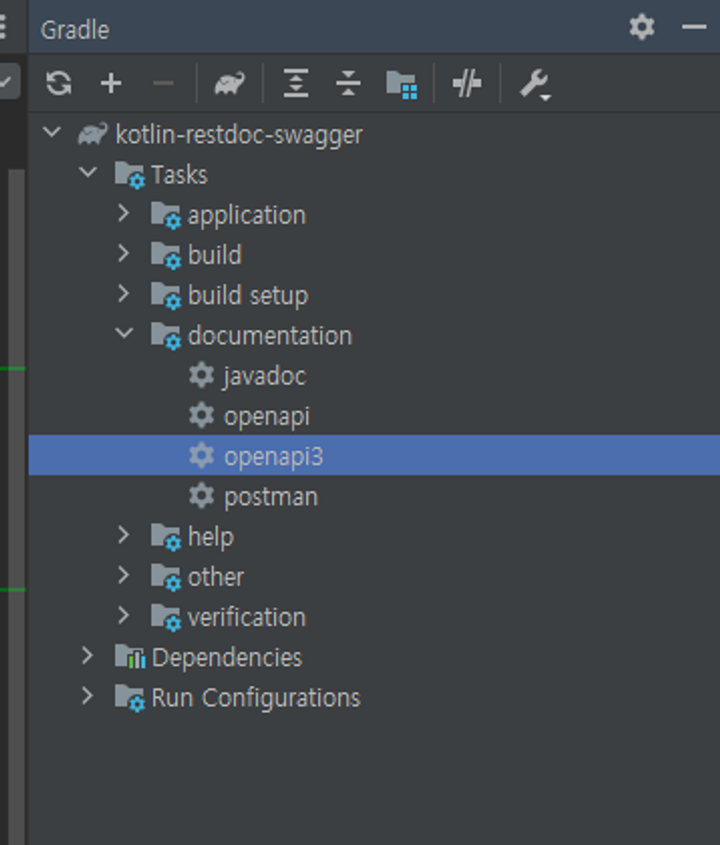
4. openapi3 명령
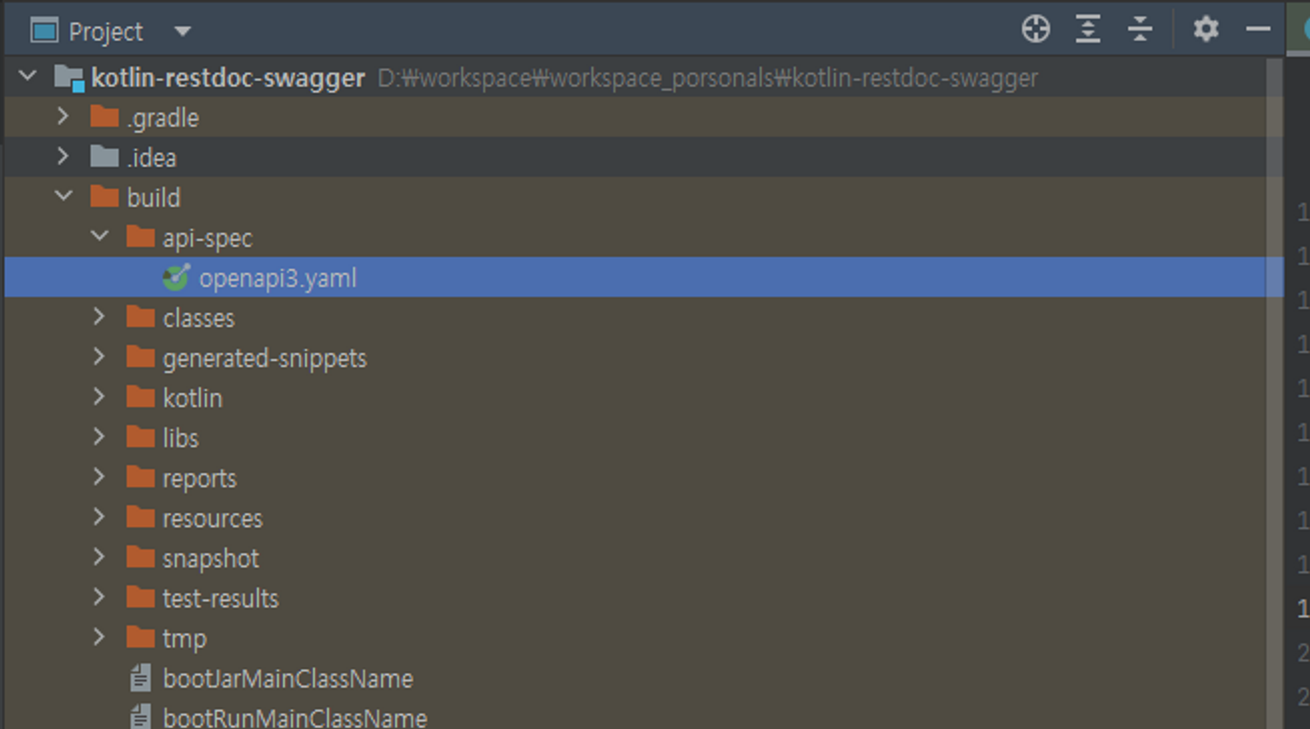
● openapi3 명령을 실행하여 openapi3.yaml(or json) 문서가 잘 생성되는지 확인한다.
● 생성되는 경로 : /build/api-spec/openapi3.yaml
./gradlew openapi3또는 intellij 의 gradle plugin 을 통해 빌드를 해도 된다.
● 결과
5. Swagger UI 연동
● swagger generator 플러그인 추가 : https://plugins.gradle.org/plugin/org.hidetake.swagger.generator
● swagger-ui 추가
org.hidetake.swagger.generator OpenAPI 3 스펙을 기반으로 SwaggerUI 생성(HTML, CSS, JS)해준다.
● 생성된 swagger-ui의 index.html을 실행하여 확인하면 됩니다.
- build.gradle.kts
plugins {
	...
	id("org.hidetake.swagger.generator") version "2.19.2"
}

dependencies {
	...
  swaggerUI("org.webjars:swagger-ui:4.15.5")
}

swaggerSources {
    create("restDocSwagger").apply {
        setInputFile(file("${project.buildDir}/api-spec/openapi3.yaml"))
    }
}
./gradlew generateSwaggerUI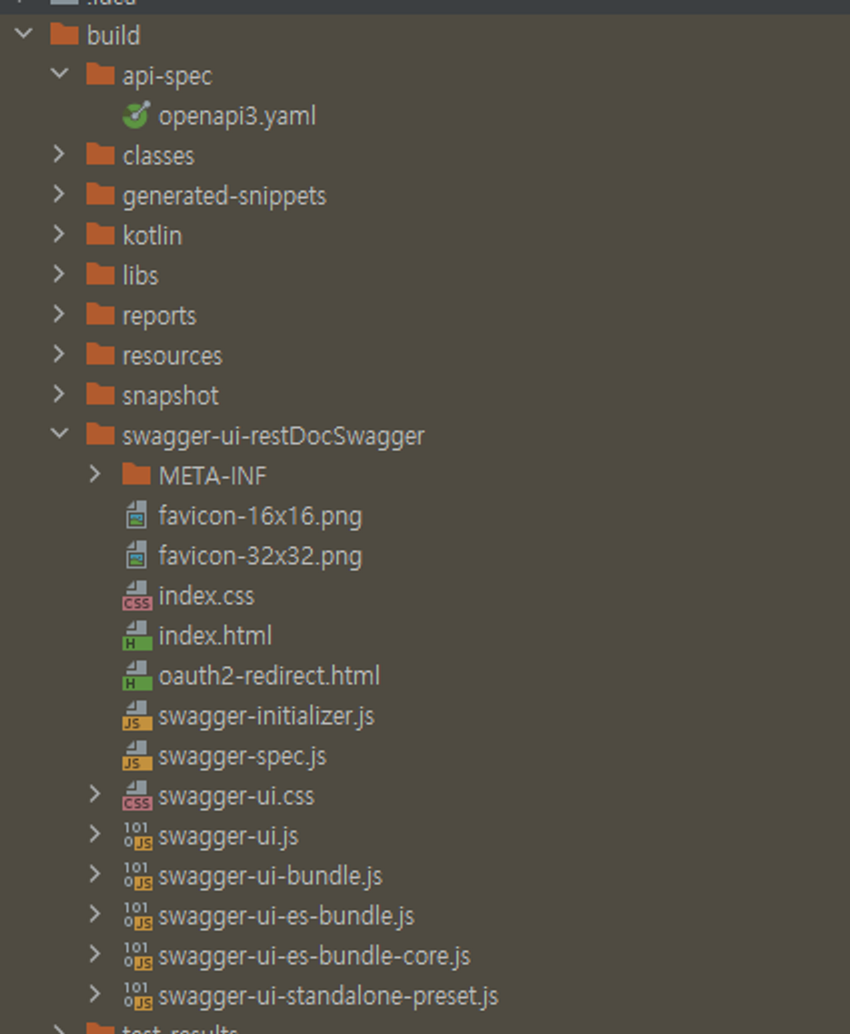
이제 rest docs -> openapi -> swagger ui로 변환이 완료가 되었다. index.html을 실행하면 swagger가 실행이 된다.
하지만 빌드시 외부에서 접근가능한 위치가 아니기 때문에 위치를 옮겨주어야 한다.
5. 빌드시 서버에서 실행
import org.hidetake.gradle.swagger.generator.GenerateSwaggerUI
import org.jetbrains.kotlin.gradle.tasks.KotlinCompile
import org.springframework.boot.gradle.tasks.bundling.BootJar

// GenerateSwaggerUI 태스크가, openapi3 task 를 의존하도록 설정
tasks.withType<GenerateSwaggerUI> {
    dependsOn("openapi3")
}

// 생성된 SwaggerUI 를 jar 에 포함시키기 위해 build/resources 경로로 복사
tasks.register<Copy>("copySwaggerUI") {
    dependsOn("generateSwaggerUIRestDocSwagger")

    val generateSwaggerTask = tasks.named<GenerateSwaggerUI>("generateSwaggerUIRestDocSwagger").get()
    from("${generateSwaggerTask.outputDir}")
    into("${project.buildDir}/resources/main/static/docs")
}

// bootJar 실행 전, copySwaggerUI 를 실행하도록 설정
tasks.withType<BootJar> {
    dependsOn("copySwaggerUI")
}
6. 실행
./gradlwe bootRun이제 문서 자동화를 접속한다.
http://localhost:8080/docs/index.html
참고 URL
https://jwkim96.tistory.com/274
https://blog.jdriven.com/2021/10/generate-swagger-ui-from-spring-rest-docs/